Process:
Firstly, I created a polygonal plane and used the CV curve tool to traced the template to obtain the above figure.
I then used the revolve tool to form the body of the bucket.
I used the extrude tool and bevel function to create tabs at both sides of the bucket. And used boolean difference function to create holes by intersecting the tab with cylinders.
I then used the CV curve tool to draw the outline of and revolved it to form a connector. This proved challenging as the size of grids shown in the image of the instructions is different from the one I was using, Hence, I had to draw accordingly to my own estimation. It turned out well in the end. After that, I used the duplicate special function to achieve another connector on the opposite side.
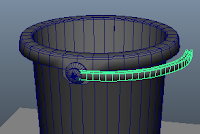
The handle was a little more challenging. I used the CV curve tool to draw the basic shape of the handle for one side, as well as the cross section. I then used the extrude tool to form the handle. Lastly, I used mirror geometry to obtain a symmetrical handle on the other side.
At first, my handle looked out of shape and weird. But by using the soft modification tool, I was able to transform the handle into a more realistic version by varying the thickness of it.
Lastly, I used the rotate tool to rotate the handle to a more natural position, forming my final product!
Reflection:
I found this exercise a lot more challenging as compared to the previous ones. It's probably because we had to draw shapes on our own by using the CV curve tool to trace images, rather than use polygons that are already provided. The instructions were slightly unclear, which posed quite a few problems, but I figured them out with the help of my classmates. I've learnt more about mirror geometry as well as revolving from this exercise which I find really useful! Overall, I feel accomplished that I can complete my bucket!


No comments:
Post a Comment