Tuesday 19 July 2011

Week 13

Exercise 1: (Watch video)

Exercise 2:

This exercise required us to animate a lamp looking robot performing a simple task of picking up the cargo box and placing it down somewhere else.


The first part of the exercise taught me how to view two panels simultaneously, which proves to be crucial and useful. The above shows the two main panels I started with, the perspective panel as well as the hierarchy panel.


I then switched to the side view and wireframe mode to make it easier for me to create the skeleton for the mechanical arm, as shown below. 


I then followed the instructions to parent the parts accordingly.


I then created an IK handle for the mechanical arm using the IK handle tool and clicking at the end extremity of the skeleton. It allows me to control the joint rotations in the skeleton using an IK handle.


A control object is needed to select and manipulate an IK system instead of directly using the IK handle. To create a control object for an IK, a locator is needed. I created a locator as shown above, the crosshair looking object just above the robot.


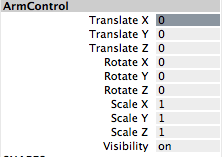
For easy identification of the locator as the control object in the scene view, I then created an annotation for the locator, known as ArmControl.


After constraining the IK handle to the ArmControl using a point constraint, I can move the IKHandle by moving the ArmControl. However, the Cargo Magnet does not continuously point downwards when rotated, which is not what I want.


Hence,  by using an orient constraint, I was able to constrain the rotations of the X, Y and Z axes of the object to match those of the target object. This is to make the CargoMagnet point downwards regardless of any other movement by the other parts. (As shown above)


The next step was to limit the range of motion of the ArmControl by locking the X channel of the Arm control and locking the rotations of the swiveling base about its Y axis.


However, the swivel base rotates in the view but the mechanical arm does not rotate.


Hence, I had to parent the IK Handle into the skeleton hierarchy. Now the mechanical arm is rotated when the swivel base rotates. 


Next, I limited the motion range of the Arm control such that the arm does not extend to a fully straightened position. The above shows the values I used.


This is the maximum the mechanical arm can go. 


While this is the minimum.


By entering the values for translate Y and Z accordingly, I positioned the cargo magnet directly above the cargo box as shown above. I then created a parent constrain for the ArmControl and CargoBox so that the CargoBox will move with the arm.


This is what happens when I rotate the mechanical arm.

I then went on to the animation section. I had to set the positions of the arm for different keyframes, and for the CargoBox as well.


Exercise 3:


Exercise 4:

1) Apart from their different sizes, it is obvious from Luxo Jr. that the big lamp is “older” and that the small lamp is “younger”.

How is this communicated by the animation? Give at least THREE examples.

Do NOT say because the small lamp is playing with a ball, or that its name is Luxo Jr. – you should be looking at the animation, how the lamps move and emote (emote means to express emotions).

  
     Firstly, it is communicated through the agility of the two lamps. The movement of the big lamp is slower as compared to the small lamp. This makes the small lamp seem more energetic,  and shows that the big lamp is of age.

     Secondly, it is communicated through the sounds the two lamps make. The big lamp produces squeaky sounds when it moves, which somehow tells us that it is old and have weak joints, while the small lamp does not squeak as much, which tells us that it is still 'new'. The small lamp also produces excited sounds when it gets happy, which imitates that of a child.

     Lastly, it is communicated throught the characterisitcs of the two lamps. The big lamp seems unfazed by the ball, unlike the small lamp who is hyped up when playing with the ball. It runs around chasing and playing with the ball like a kid, while the big lamp 'supervises' like a parent would do.


2) Give an example from Luxo Jr of how timing is used for comic effect. Explain how the timing decisions contribute to the humour.

    After the small lamp flattens the ball and exits the scene with disappointment, it would seem to the audience that the clip has ended. However, it returned, this time with a much bigger ball, which surprises the audience and adds a sense of humour to the animation.

3) When you create a joint chain, these form a hierarchy, with the first joint at the top and the last joint at the bottom. Explain why this is necessary for the joints to work properly.

    The 1st joint controls the joints below it in the hierarchy,  the 2nd joint controls the joints below it, while not the 1st joint and so on. This works like the human body, where the shoulder join controls the whole arm whereas the elbow joint controls the lower arm and our wrist controls our palm.

     It is necessary for the joints to work correctly for the animation to look natural realistic. One wouldn't want a character with mess up joints, unless intended.


Monday 18 July 2011

Week 12

1)  Do you need to be able to draw well to create good 2D animation? Explain your view.


I don't think the ability to draw really affects the standard of a 2D animation as long as the animator can draw well enough to convey his message. The flow and timing of the movements are more important. However, the ability to draw well plays a part in creating an APPEALING 2D animation. Who wouldn't prefer better visuals when it comes to animation?

2) Do you need to be able to draw well to create good 3D animation? Explain your view.

   No, I think that the ability to draw does not affect 3D animation, as long as the animator can visualise the object/character in his head, as 3D animation involves modeling rather than drawing. The animator builds an/a object/character using 3D blocks, without the need of drawing. However, being able to draw well can help in 3D animation if the animator sketches out the plan on paper first before starting to model.

3) What do you think would separate a piece of poor animation from a piece of good animation? In other words, how would you go about deciding if a piece of animation is good or bad?

I feel that a good animation will be one that is more appealing than that of a poor animation. An animation has to appeal to its audience so that they will continue watching it. A good animation is also one that is convincing and realistic, more or less obeying the 12 principles of animation. The animation should also be interesting with climaxes and clear actions, instead of just dull and faint actions.

4) In 2D animation, you need to be very aware of timing at a frame by frame level, using timing charts and other techniques - but for 3D animation, this is handled using the graph editor, which is more concerned with manipulating rates of change over time.
Does this affect how you approach your animation work? Explain.

    Timing is very important for both, 2D and 3D animations. It relatively affects how I approach my animation. When doing 2D animaiton, there isn't a graph editor, hence, the planning of each frame is very important. When there is a mistake, it is time consuming to redraw the frames. However, when doing 3D animation, I can roughly place the object and keyframe it by estimation as the graph editor will allow me to freely adjust my animation curves.

5) Give a brief critique of Maya as an animation tool. Don't just say Maya makes animation difficult, or easy, or that you need to learn a lot of stuff to use Maya - explain what Maya does well and not so well in terms of creating animation.
 
    To me, MAYA is a useful tool for 3D animation as it is well equiped with many functions. The time slider is easy to understand and allows animators to make changes easily at different keyframes. Personally, I find the graph editor extremely useful for me to smoothen my animation. It saves alot of time as I can place and keyframe the object by estimation to create a general motion, and then use the graph editor to adjust it properly afterwards. The playblast feature also allows me to  easily export my file as a video.


Week 11

E-LEARNING: KEY FRAMING


I was provided a maya file downloaded from Olive, which shows a set up of a platform and a ball. It resembles a tennis court, with the net and a tennis ball.

 This is the time slider for the animation, which I set to 72, which will make the animation last 3 seconds when played at 24frames per second.

 I set a keyframe at frame 1, which shows the ball at its initial position, the start.

 I then set another keyframe at frame 72 to show the ball's final position.

 When I play the animation however, the ball passes right through the net as shown above, which was not what I want. I want the ball to go OVER the net.

Therefore, at around frame 34, I set a keyframe after shifting the ball upwards to position it above the net. Now, when I play the animation, the ball goes over the net.

After that, by shifting the ball at different frames and setting keyframes, I was able to make the ball bounce once near the end to make the bounce more realistic. The tutorial also taught me how to use the graph editor to adjust the curves, to make the bounce more smooth.


This is my final animation of the ball.

My thoughts:

This is my first time creating an animation on Maya. I feel that 3D animation is much more complicated than that of 2D animation done on Pencil. However, the idea of it is similar, by setting keyframes at different points. Also, I find the graph editor somehow difficult to understand. Overall, I feel accomplished to have finish a basic ball animation.


This is my animation of a bowling ball dropping. Compared to the previous animation, the bowling ball is harder and heavier, which means it is not as bouncy.

My thoughts:

My bowling ball animation is not very convincing as I do not know how to make it look like it is rotating as it goes along.


LAB 2: SQUASH AND STRETCH


I started by creating a sphere and grouped it to itself twice. I then modify the groups by centre pivoting.

 I created a squash deformer for the ball. (Green line)

 Creation of a platform for the ball to bounce on.

I locked various attributes of the ball and the groups accordingly to the tutorial provided.
Afterwards, I started setting keyframes for the ball animation.

 Keyframe at frame 1 which shows the ball at the starting position, over the platform. (I changed the ball color to make it clearer.)

 Keyframe at frame 100, which shows the ball at its final position.

I repeated the steps of moving the ball to different positions and setting keyframes at different frames to obtain the movement of a bouncing ball. However, the motion seemed unatural.

Hence, I used the graph editor to make my animation smoother by moving the points and tangents.

I then started to work on the squashing and stretching of the ball by changing the values of squash1Handle's Factor, a positive value creates a stretched ball, while a negative value creates a squashed ball. I experimented with different values as the one in the tutorial, 1, seemed too exaggerated, and I settled for less exaggerated values.

 Stretched ball.

Squashed ball.

I then made the ball rotate as it goes along by changing the Rotate Z values and setting keyframes. The tutorial told us to put -1200 for the rotate Z value at the end, but I tried that and found that it rotated too fast, which made my animation seem unatural, hence I settled for a smaller value so that the rotation will be slower and more realistic.


This is the final outcome of my animation. (I changed the texture of the ball to 2d checkered to make the rotation more obvious and visible.)

My thoughts:

Initially, I had difficulty when it came to the squashing and stretching part because when I stretched or squashed the ball, it isn't sitting nicely on the platform anymore. When I stretch it, part of it protrudes out of the bottom of the platform and when I squash it, it floats above the platform. Hence I had to change the values of the attributes again. 

Before I started on this exercise, I watched the demo clip and thought that the rotation of the ball seemed difficult to do, but after doing the exercise, it turned out to be really simple.


Why is squash and stretch so useful in animation?

Squashing and stretching gives the illusion of weight of volume to an animated object or character. It makes the object or character more realistic by showing the effects of gravity acting on it. For example, the bouncing ball I've done above, the mass of the ball remains the same, but the shape changes as it moves. It squashes as it hits the ground due to impact and stretches when it bounces back up. Without squash and stretch, the ball would look rigid and unrealistic.

Think of a situation in which extreme squash and stretch could be applied to a character - try to be original.

Extreme squash and stretch can be applied to cartoon characters, those that are trying to achieve a cute and cuddly appearance. Squash and stretch will make the character appear squishy and flexible. An example for this would be a Slime which bounces up and down.

Think of an animation example where squash and stretch would NOT be appropriate. 
 
Squash and stretch would not be appropriate when it comes to solid objects such as metal and other hard materials. For example a marble or a bowling ball, these would not change in shape upon impact.


If squash and stretch doesn't really happen so obviously in real life, why do you think it is so effective in animation?

Squash and stretch is so effective in animation as it provides exaggeration, which makes animation, especially cartoons more interesting. It brings the object/character to life and provides a sense of appeal by giving them volume. Many cartoons use exaggeration. Hence, squash and stretch comes into the picture at many points, especially when impact is involved. For example, a ball hitting the ground will be squashed upon impact.


Week 10

LAB 1: Exercise 1 and 2


Squash and Stretch: 
The purpose of which is to give a sense of weight and flexibility to objects. In this video of me squatting and jumping, it is as though I am squashed (when squatting) and stretched (when jumping up). It gives a sense of exaggeration to make the action more interesting.

Anticipation:
Anticipation is used to prepare the audience for an action, and to make the action appear more realistic. In this video of me jumping, I squat before my jump. This prepares the audience, which will then anticipate my jump.


Follow through and overlapping action:
Nothing stops all at once. After my jump, when I just landed, my body stops moving but my hair continues to catch up and only comes to a stop after a while.


Staging:
It is clear that I am the main focus of this video as the audience's attention will be directed to the centre of the screen. The background and surrounding are simple and do not distract the audience from my actions.


LAB 1: Exercise 3


Spongebob is a character made of sponge. This makes him flexible, which means he has a great SQUASH AND STRETCH factor. This can be seen from 00:25 when he is tied up in the rope, his features and body are squashed.

At 00:27, Mr Krabs pulls on the rope, which makes the audience ANTICIPATE a following action, which is the dropping down of spongebob. The rope seems to be of an elastic material such as rubber as it STRETCHES when Mr Krabs pulls on it.

From 00:10 to 00:14, Spongebob is seen skipping and swinging his arms. The motion of his arms are in the path of ARCS.

When Mr Krabs walk at 1:22, his legs move really fast, this is a SECONDARY ACTION to enrich his walking. It emphasises his form as a crab and gives the action a sense of urgency.

The thing I love about cartoons, especially Spongebob Squarepants, is that they make use of alot of EXAGGERATION. This is especially evident in facial expressions. It gives the cartoon character a sense of humour and appeal.

Spongebob APPEALS to the audience(children) as he is cute and funny. His facial expressions and actions shape up his character as a 'comedian' and protagonist as the show.

My thoughts:

This exercise taught me to observe animation more closely. Before this, it never did occur to me that there are so many principles of animation that viewers tend to overlook. It amazes me that in animations, even those of cartoons that are targeted towards young children, even tiny details obey many animation principles.


LAB 2:


 This is the bouncing beach ball animation I did using Pencil. I had to watch several videos which taught me how to go about animating a ball. Since a beach ball is lighter and softer as compared to other solid balls such as bowling ball or golf ball, the squash and stretch factor is much higher. Hence, the squashing and stretching is alot more obvious and it is more bouncy.


This is a video on Youtube that explains the animation of a bouncing ball in detail and covers many important aspects such as spacing. is really helpful if I want to animate a bouncing ball more realistically in the future.


 This is the animation of the bowling ball I have done using Pencil.


My thoughts:

This is my first time creating an animation using Pencil software. It is somehow easy to use, but can be quite frustrating as I can only see the image of the previous keyframe and not all of them. The bouncing ball the basic of animation and a place to start, but much more can be improved on my animation in terms of better timing and velocity of the ball.


This is the animation I have done of the jumping action using Pencil.

LAB 2: Exercise 2

1. What is ease-in ease-out in reference to animation?

It is the variation of the spacing between the images between keyframes. A larger spacing will make the motion of the object appear faster and quicker, while a smaller spacing will make it appear slower. This is an important aspect to consider when it comes to animation, as it makes the movement of an object more realistic and convincing.

2. What does frames-per-second mean?

It refers to the number of frames displayed a second. More frames are used per second when a smooth animation is to be achieved. The principle of it is somehow similar to that of ease-in ease-out, whereby many of the same frames are used to portray a slower motion.

3. The spacing of the ticks in the animation chart below is for an object bouncing with linear speed over 12 frames - draw a similar chart, but with ease-in and ease-out.